Geothermal Thermostat Optimization: Avoid Aux Heat Waste
By Priya Nandakumar • 27th Mar
Why Your Geothermal Thermostat Settings Matter More Than You Think
Geothermal thermostat optimization isn't just about comfort. It is about preventing your system from burning expensive auxiliary heat when it shouldn't. Auxiliary (Aux) heat in a geothermal system can consume 2-3 times more electricity than normal heating operation, which is why I've seen homeowners' January bills spike without any obvious reason. The root cause? A thermostat configured for convenience instead of geothermal thermostat compatibility with the ground-source heat pump logic beneath it. In this guide, I'll walk you through the questions I hear most often and the wiring-aware answers that actually work.
FAQ: Geothermal Thermostat Optimization Essentials
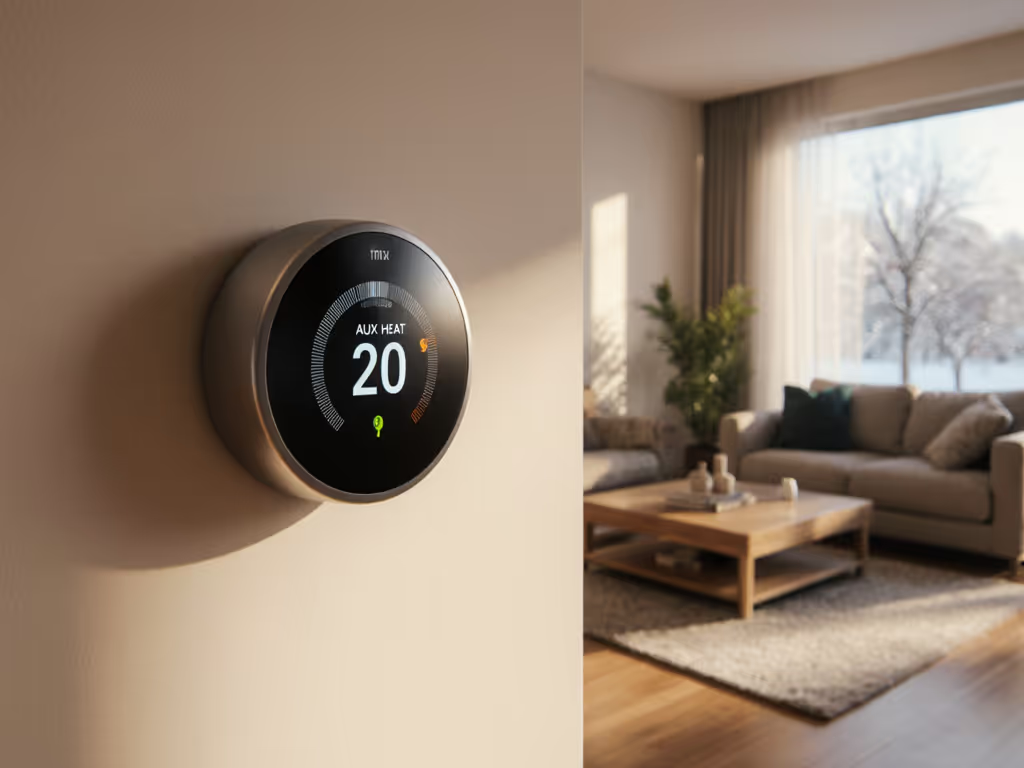
Q1: What Triggers Auxiliary Heat in My Geothermal System?
Auxiliary heat kicks in when your thermostat detects a temperature gap between the setpoint and the actual room temperature of 5°F or more.[2] Think of it as the system's safety net: if the ground loop can't keep up, it turns on backup electric resistance heat to bridge the gap fast. But here is the catch: many homeowners trigger this unnecessarily through thermostat scheduling.
On a service call last year, I found a homeowner who'd tied W2 (auxiliary heat) into the AUX terminal after a smart-upgrade install. The result was short-cycling of the furnace and constant auxiliary heat engagement. We photographed the board, labeled each conductor with the exact terminal notation (R, C, W, Y, G), and corrected it with a proper jumper and outdoor sensor logic. Once we restored the right wiring path, the heat stabilized and the unnecessary aux draws stopped. The lesson: compatibility and safety come before features every time. Your thermostat's wiring must align with your installer's design, not your preferences.
Risk Flag: If you're installing a new thermostat yourself, do not assume the existing W or W2 wire is correct. Photograph and document your wiring before removal. If you're weighing difficulty and risk, see our DIY vs pro wiring guide before you touch a terminal. This protects both your warranty and your wallet.
Q2: Why Do Scheduling and Temperature Setbacks Waste Energy?
You'd think lowering the temperature during work hours would save energy. It seems logical. But geothermal systems are most efficient when they maintain a single, stable setpoint.[1] Here is why:
A geothermal loop works by moving heat steadily between your home and the ground. Small, continuous adjustments use far less energy than dramatic temperature swings. When you drop the thermostat to 60°F and then raise it to 70°F, your system has to close a 10-degree gap quickly. If the heat pump can't do it alone, aux heat engages, and now you're paying for electricity instead of ground heat.
Research from geothermal specialists shows that scheduling setbacks of 5°F or more frequently trigger auxiliary heat engagement.[2] If you're trying to save money, a setback strategy often backfires. Instead, set a comfortable temperature and leave it there. A properly sized geothermal loop can maintain stable indoor temps without auxiliary heat in most conditions.
Actionable Step: Program your thermostat to a single target temperature (typically 68-70°F in winter). Let the system run continuously. Test your January and February energy costs against previous years; most homeowners see a reduction within the first month. To analyze those bills and spot aux spikes, use our smart thermostat energy report guide.
Q3: How Do I Know If My Thermostat Is Staging the Heat Pump Correctly?
Modern geothermal systems often feature dual-source geothermal system control (meaning your heat pump has a primary stage (higher capacity) and possibly a secondary stage that engages only if needed). Your thermostat must be programmed to keep the heat pump in its primary stage until it reaches setpoint, rather than downstaging (reducing output) as the home gets warmer.
Many programmable thermostats default to downstaging, which sounds efficient but isn't. Downstaging tells the heat pump to reduce its output mid-cycle, prolonging runtime and wasting energy. Instead, your installer should configure the thermostat to run at full stage 1 until setpoint is reached, then cycle off and on in small increments to maintain that temperature.[1]
Tool Checklist for Verification:
- Access your thermostat's installer menu (usually requires a PIN or technician mode).
- Review the "heating stages" or "compressor staging" settings.
- Confirm that stage 1 runs until setpoint, not downstaging partway.
- If you're unsure, contact your installer or HVAC technician; this is not a setting to guess. For added peace of mind, consider models with smart thermostat diagnostics that flag issues before they become emergencies.
Q4: What Role Does Air Filter Maintenance Play in Preventing Aux Heat?
You might think air filters are about air quality alone. They're not. A clogged filter restricts airflow, forcing your heat pump compressor to work harder. Restricted airflow also means longer runtimes and higher operating stages, both of which consume more electricity and increase the likelihood of auxiliary heat engagement.[2]
By keeping your filter clean, you reduce system strain and prevent unnecessary auxiliary heat triggers. I recommend checking your filter once a month, especially during winter when the system runs continuously. Replace it immediately if it's visibly clogged.[5]
Quick Check: Hold the filter up to a light source. If you can't see light through it clearly, replace it now, even if it hasn't reached a month.
Q5: How Does Ductwork Sealing Reduce Energy Waste?
Leaks and disconnections in your ductwork mean heated air escapes before it reaches your rooms. Your thermostat's sensor detects that the home is still cold, so it keeps the system running longer. Extended runtime increases the odds that auxiliary heat will engage if the heat pump can't keep up.[1]
Sealing ductwork is one of the highest-ROI maintenance tasks. Even a few small leaks can add 10-15% to your heating runtime and, consequently, your energy bill.
Simple Inspection:
- Visually trace accessible ductwork in your basement, attic, or crawl space.
- Look for visible gaps, crushed sections, or disconnected joints.
- Seal minor leaks with metal-backed tape or mastic sealant (not duct tape, which degrades).
- For major issues, have a professional perform a ductwork blower-door test and sealing.
Q6: What's the Role of Ground Temperature Monitoring in Thermostat Optimization?
Some advanced ground temperature monitoring thermostat systems (or companion sensors) track outdoor ground temperature to adjust heating stages. This is particularly valuable in cold climates where ground loop efficiency degrades in deep winter. However, most homeowner-grade thermostats don't integrate ground-temperature data directly.
Instead, your geothermal defrost cycle management relies on the outdoor air sensor wired to your heat pump. This sensor tells the system when to reverse the refrigerant flow to melt ice buildup on the outdoor coil in defrost mode. Make sure this sensor is connected correctly and not shaded by sunlight or heated surfaces, as a misreading triggers unnecessary defrost cycles and wasted runtime.
Risk Flag: Do not bypass or disconnect your outdoor air sensor to "simplify" the wiring. It's essential for safe and efficient defrost logic. If you're unsure whether it's connected, photograph the board and consult your installer.
Q7: Can a "Smart" or Programmable Thermostat Be Worse Than a Basic One?
Yes, if it's not calibrated for your geothermal system. Smart thermostats with learning algorithms sometimes overshoot setpoints or engage auxiliary heat unnecessarily as they "learn" your home. Programmable thermostats with aggressive schedules (like dropping to 62°F during the workday) force auxiliary heat to work overtime.
The safest approach: set a consistent, comfortable temperature and disable all scheduling and learning features until you confirm the basics are working. Once your system has run for a full heating and cooling season, you can safely experiment with mild adjustments (2-3°F max).
Optimization Workflow: Prevent Auxiliary Heat Waste
Step 1: Document Your Wiring Before Removal. Photograph the existing thermostat's wire terminals and the furnace/air handler control board. This is non-negotiable if you're replacing a thermostat.
Step 2: Verify Thermostat Compatibility. Confirm that your new thermostat supports your heat pump's staging logic and any dual-fuel or geothermal-specific functions. Carrier, for example, offers Carrier heat pump thermostat models with native geothermal programming. These are designed to prevent the exact wiring mistakes that lead to short-cycling.
Step 3: Set a Single Setpoint. Program the thermostat to a stable temperature (68-70°F for winter). Disable scheduling, learning, and setbacks. For more tactics beyond a steady setpoint, follow our smart thermostat savings setup.
Step 4: Inspect Air Filter, Ductwork, and Vents. Clean or replace the filter monthly. Seal any visible ductwork leaks and verify that all supply and return vents are clear.
Step 5: Verify Staging and Sensor Wiring. Have your installer confirm that primary heating stage runs until setpoint and that the outdoor air sensor is connected. Request a copy of the thermostat configuration printout.
Step 6: Monitor Your First Full Month. Track your energy usage during January or February. If auxiliary heat is still running frequently, contact your installer for a diagnostic. High auxiliary runtime in normal cold weather indicates a sizing, refrigerant, or compressor issue (not a thermostat problem).
Your Next Move
Geothermal thermostat optimization begins with matching your thermostat to your exact equipment and wiring, then resisting the urge to tinker. Set a comfortable, stable temperature and let the ground loop do its job. Before you buy or install any new thermostat, verify its compatibility with your geothermal system in writing. If you're uncertain about your current wiring or staging settings, invest in a diagnostic call from your original installer. It is far cheaper than three months of wasted auxiliary heat.
Start today: photograph your current thermostat and control board, check your air filter, and commit to a single setpoint for the next 30 days. The efficiency gains speak for themselves, and your energy bill will reflect the difference.
Related Articles